jmathanim
A Java library to make mathematical animations
Project maintained by davidgutierrezrubio Hosted on GitHub Pages — Theme by mattgraham
Dealing with paths
Shapes are the most fundamental objects in JMathAnim. Almost anything that is drawn on the screen is ultimately a Shape (in fact, the Renderer class only admits the core methods drawShape and drawImage). A Shapeobject contains, apart from styling parameters, a JMPathobject that stores the path that will be drawn. In this chapter, we will see its structure and how to deal with its elements to create more complex objects. The utility class PathUtils has a method to show the control points of a path in the scene.
If we run the following code:
Shape ellipse=Shape.circle().scale(1,.5);
PathUtils.addJMPathPointsToScene(ellipse,this);
add(ellipse);
waitSeconds(5);//Time for a screenshot
you will obtain the following image for 5 seconds:
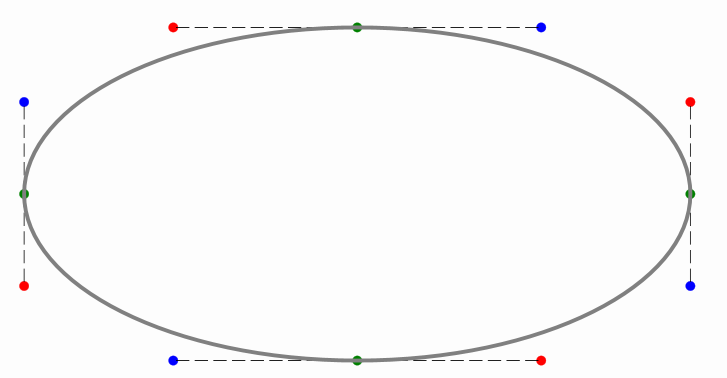
Each JMPathPoint has information about the precise shape of the curve at this point. When passing this information to the renderer, a cubic Bézier curve is drawn using the parameters of 2 consecutive jmpathpoints.
You can access a particular JMPathPoint from the Shape class using the get method. So, in the previous code, ellipse.get(0) will return the first JMPathPoint of the path. These points are stored in a CircularArray object so that ellipse.get(-1) will return the last element of the path.
If you set the flag to show debug points with the command DebugTools.setShowDebugPoints(ellipse, true) JMathAnim will number the path’s points for you:
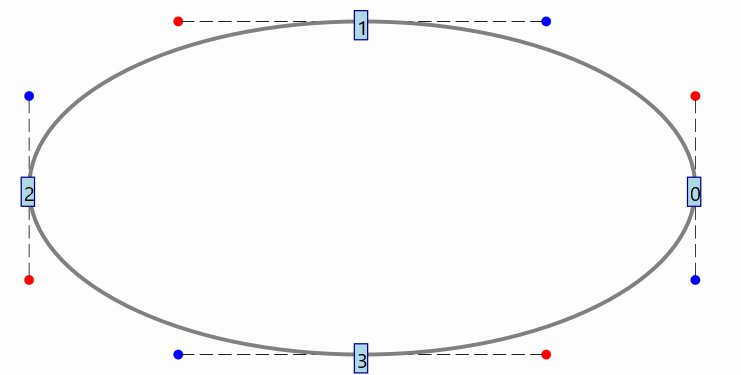
The JMPathPoint implements the AffineTransformable interface so you can apply the usual transformations like rotate, scale, shift or any affine transformation. JMathAnim will transform the shape point and the control points accordingly.
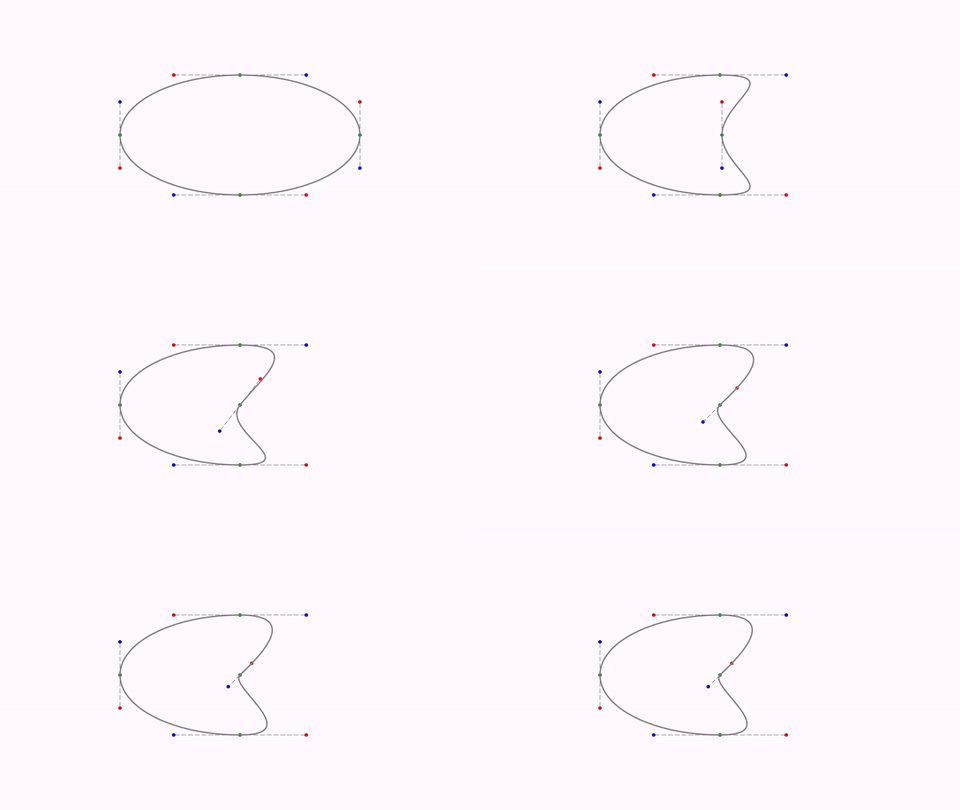
You can also apply these transforms to individual jmpathpoints. For example, if we add the 3 lines right before the waitSeconds command:
play.shift(4,-1,0,ellipse.get(0));
play.rotate(4,-45*DEGREES,ellipse.get(0));
play.scale(4,.5,ellipse.get(0));
you will obtain the following animation. Any affine transformation to a Shape transforms every JMPathPointof the path.
Each JMPathPoint has 2 public boolean variables, isCurved and isThisSegmentVisible. The first one determines if the Bézier curve that ends at this point is curved or straight, and the second one determines if it should be drawn or not.
For example, if we add the following line after the creation of an ellipseobject:
ellipse.get(1).setSegmentToThisPointVisible(false);
The piece of curve that goes from point 0 to 1 will not be drawn:
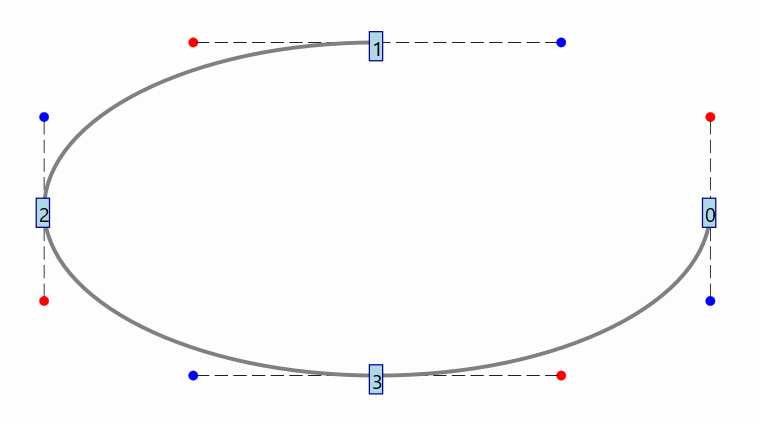
This way, if you have an open curve and you want to close it, you just have to add the command:
myOpenShape.get(0).setSegmentToThisPointVisible=true;
if we add this line instead:
ellipse.get(1).setSegmentToThisPointCurved(false)
The piece of curve that goes from 0 to 1 is drawn in a straight line:
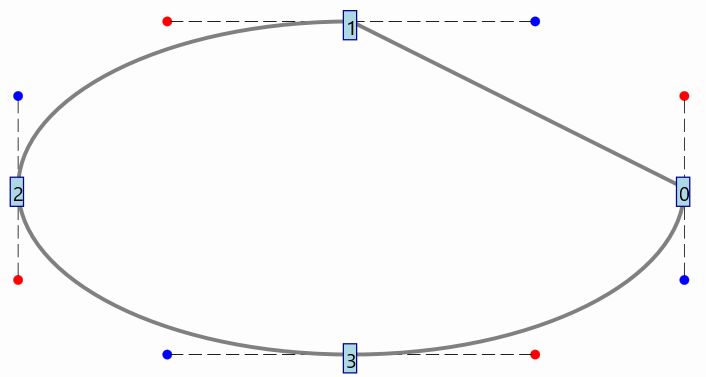
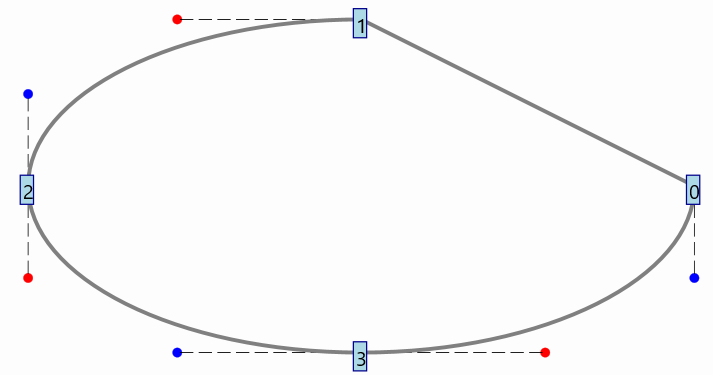
You can also make a Bézier curve straight manipulating the control points, accesible through methods getV(), getVEnter() and getVExit(). In this case, the exit control point from point 0 and enter control point from point 1 should have the same coordinates as their respective points.
//make coordinates of control point exit of point 0 equals to that point
ellipse.get(0).getVExit().copyCoordinatesFrom(ellipse.get(0).getV());

//make coordinates of control point enter of point 1 equals to that point
ellipse.get(1).getVEnter().copyCoordinatesFrom(ellipse.get(1).getV());
You will have the same effect, with the control points altered:
If you have a closed path and want to open it, you should duplicate the first JMPathPoint and make the segment between them invisible. That’s what the openPath method does. If you want to open the previous shape, you can do it with the command ellipse.getPath().openPath(). The visual appearance of the shape is unaltered, but moving the first or last point of the shape will behave differently.
Retrieving points from paths
There are several methods to get points from the path.
Shape c=Shape.circle();
JMPathPoint jmp = c.get(0); //Gets the first JMPathPoint of the path
Point P=c.getPoint(0); //Gets the first Point. This is equivalent to Point P=c.get(0).p
int size=c.size(); //Gets the number of JMPathPoint objects in the path
Sometimes we are interested in getting where a precise point should be in the path. JMathAnim has several methods to compute the interpolated JMPathPoint at a specified position. The interpolation parameter alpha ranges from 0 to 1, where 0 is the start of the Shape (point at index 0) and 1 is the end (point at index size()-1).
Shape c=Shape.circle();
Vec interpP=c.getVecAt(.2); //Computes the interpolated coordinates at alpha=.2;
JMPathPoint interpJmp = c.getPath().getJMPointAt(.2);//Interpolated JMPathPoint
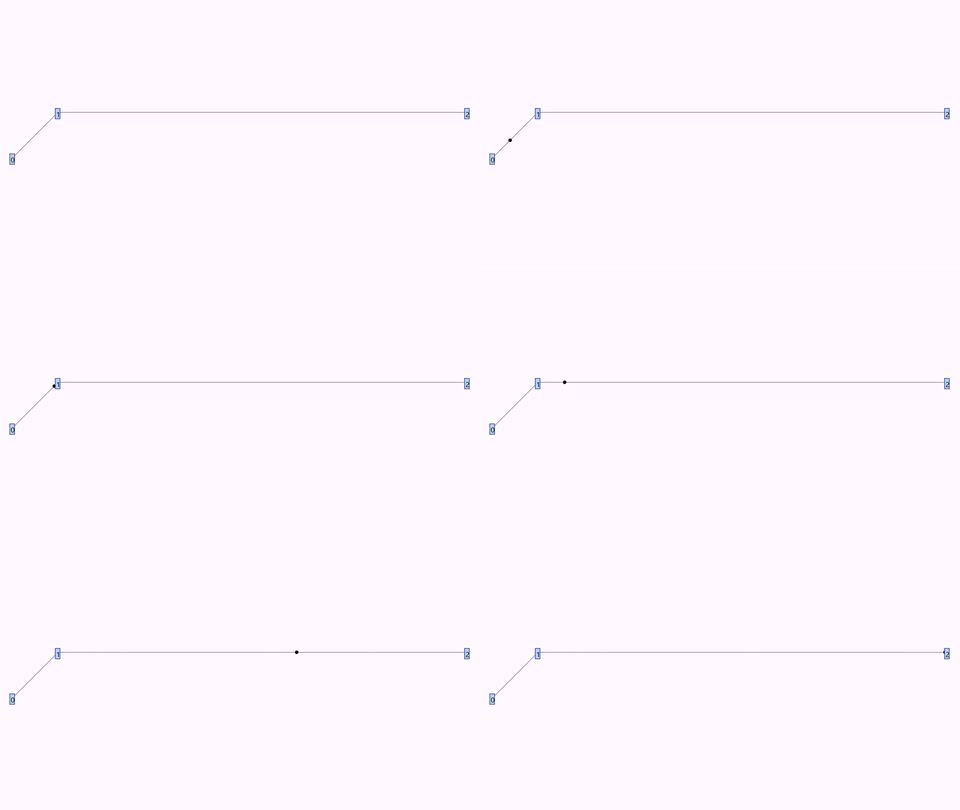
Note that this parameter does not run in “constant velocity”. For example, in a path with 3 elements like the figure:

The whole range [0,.5] maps to the segment from point 0 to 1, but the equal-size range [.5,1] maps to the segment from point 1 to 2. Thus, if we animate a point moving with constant alpha velocity, this point will travel faster from 1 to 2 than from 0 to 1:
If you want to insert an interpolated JMPathPoint into a path, it is not enough to simply add it to the array of elements of the path; it is also necessary to recompute the control points of the adjacent elements. This is done with the command .getPath().insertJMPointAt(int k, double alpha) . This command will insert a new JMPathPoint between the k-th and (k+1)-th ones, with the alpha parameter. An alpha value of 0 means the k-th point, 0.5 means the middle-path point, and 1 means the (k+1)-th point.
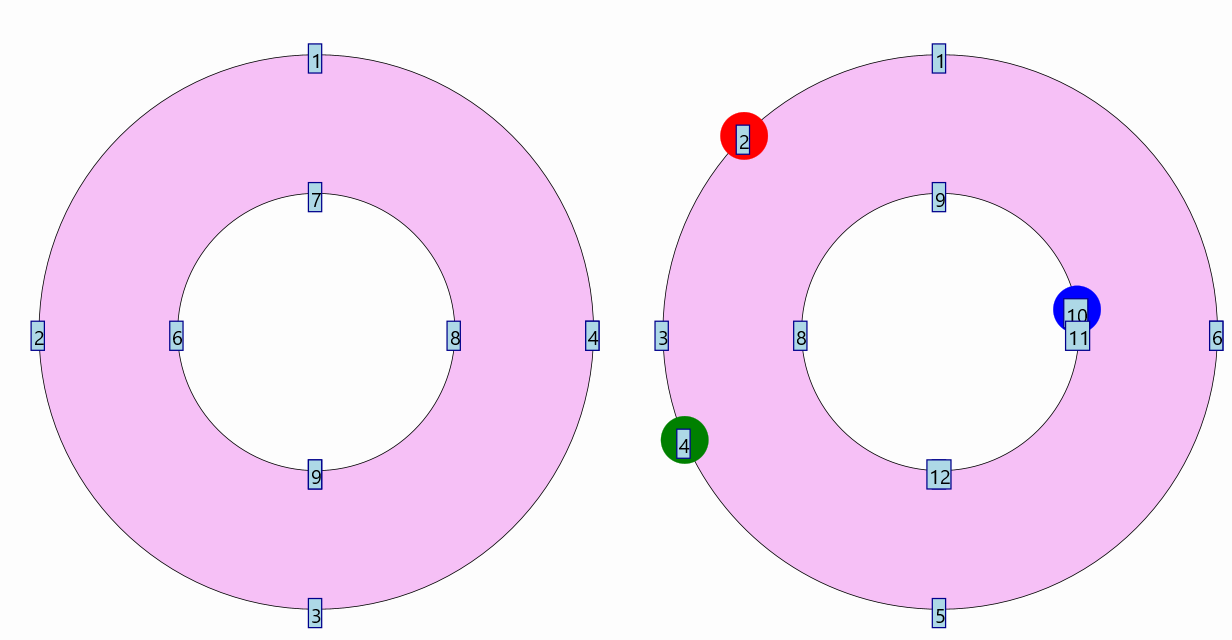
For example, the following code draws an annulus and a copy with 3 new JMPathPoints inserted:
Shape c = Shape.annulus(.5, 1).fillColor("pink");
DebugTools.setShowDebugPoints(c,true);
Shape c2 = c.copy()
    .stack()
    .withGaps(.25)
    .withDestinyAnchor(AnchorType.RIGHT)
    .toObject(c);
add(c, c2);


JMPathPoint newJmp1 = c2.getPath().insertJMPointAt(1, .5);
JMPathPoint newJmp2 = c2.getPath().insertJMPointAt(3, .25);
JMPathPoint newJmp3 = c2.getPath().insertJMPointAt(9, .9);

//We create new Point objects to show the location of the new JMPathPoints
add(
    Point.at(newJmp1.getV()).thickness(150).drawColor("red"),
    Point.at(newJmp2.getV()).thickness(150).drawColor("green"),
    Point.at(newJmp3.getV()).thickness(150).drawColor("blue")
);

camera.centerAtAllObjects();
waitSeconds(3);
Note how the indices change (the index 0 is hidden by the indices 4 and 7 respectively):
Boolean operations with paths
JMathAnim allows boolean operations union, intersection and substract for Shapeobjects. These methods relay on the boolean methods of the JavaFX library.
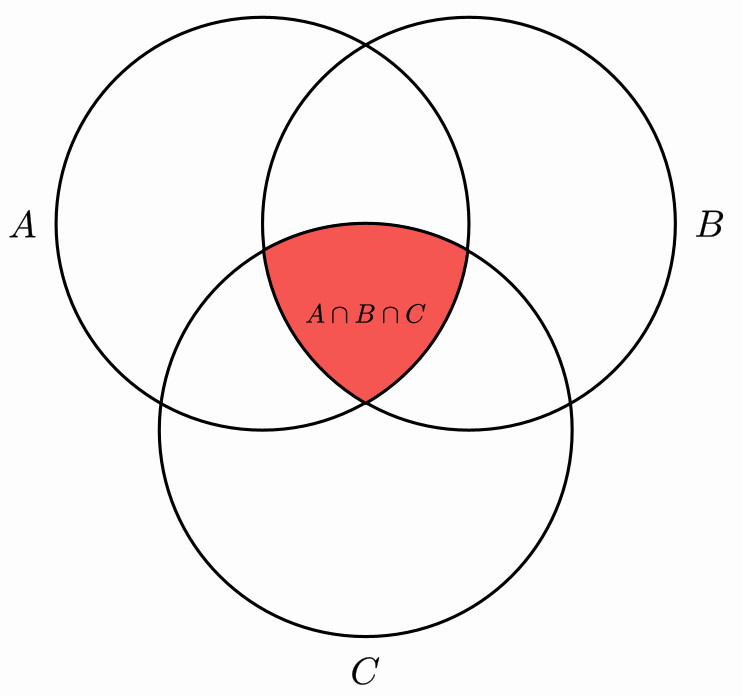
  Shape A = Shape.circle().thickness(8);
        Shape B = A.copy().shift(.8, 0);
        Shape C = A.copy().shift(.4, -.8);
        Shape intersect = A.copy().intersect(B).intersect(C).style("solidRed");
        add(A, B, C, intersect);
        add(
                LatexMathObject.make("$A$")
                        .stack()
                        .withGaps(.1)
                        .withDestinyAnchor(AnchorType.LEFT)
                        .toObject(A),
                LatexMathObject.make("$B$")
                        .stack()
                        .withGaps(.1)
                        .withDestinyAnchor(AnchorType.RIGHT)
                        .toObject(B),
                LatexMathObject.make("$C$")
                        .stack()
                        .withGaps(.1)
                        .withDestinyAnchor(AnchorType.LOWER)
                        .toObject(C),
                LatexMathObject.make("$A\\cap B\\cap C$")
                        .stack()
                        .toObject(intersect)
        );
        camera.centerAtAllObjects();
        waitSeconds(5);//Smile, you're being screenshot!
Gives the following image:
JMathAnim uses a private method called distille() that gets rid of redundant path points in order to get the simplest result possible. However, it is known that in some cases, artifacts may occur, especially when dealing with multiple boolean operations in complex paths, due to the JavaFX algorithm.
Merging paths
The Shapeobject admits the merge method with the syntax A.merge(B,connectAtoB, connectBtoA).This method will add all the path points from shape B to those of shape A. The boolean flags connectAtoBand connectBtoA determine if the end of path A should connect by a straight line with the beginning of path B and connectBtoA, in a similar fashion, if end of path B should connect to the beginning of path A.
When using this method, the reverse() method may be useful to exchange beginning and ending points of a path.
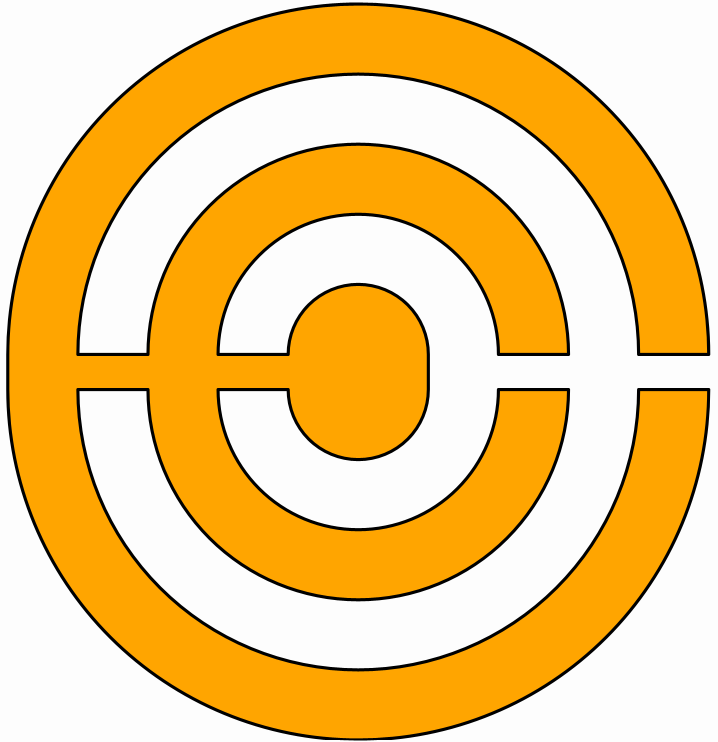
For example, the following code merges several semicircles to form a closed shape. Note that the even arcs are reversed, whereas the odd ones are not:
Shape upperLeaf = Shape.arc(PI);
boolean reverse = true;
int numberOfArcs = 6;
for (int i = 2; i < numberOfArcs; i++) {
    final Shape newSh = Shape.arc(PI).scale(Point.origin(), i, i);
    if (reverse) {
        newSh.reverse();
    }
    upperLeaf.merge(newSh, true, false);
    reverse = !reverse;
}
//Now we made a copy of the upper leaf and merge them
Shape lowerLeaf = upperLeaf.copy()
    .reverse()
    .scale(Point.origin(), 1, -1)
    .shift(0, -.5);
upperLeaf.merge(lowerLeaf, true, true);
add(upperLeaf.style("solidorange"));
camera.adjustToAllObjects();
waitSeconds(5);//Yes, screenshot!
Will give the following figure:
In the Gallery section, you can see how to generate Koch and Hilbert curves iteratively using the merge method.
Subpaths
The JMPathcommand .subpath(double a, double b) returns the subpath that goes from a to b, where a and b are interpolation parameters as described before, from 0 to 1.
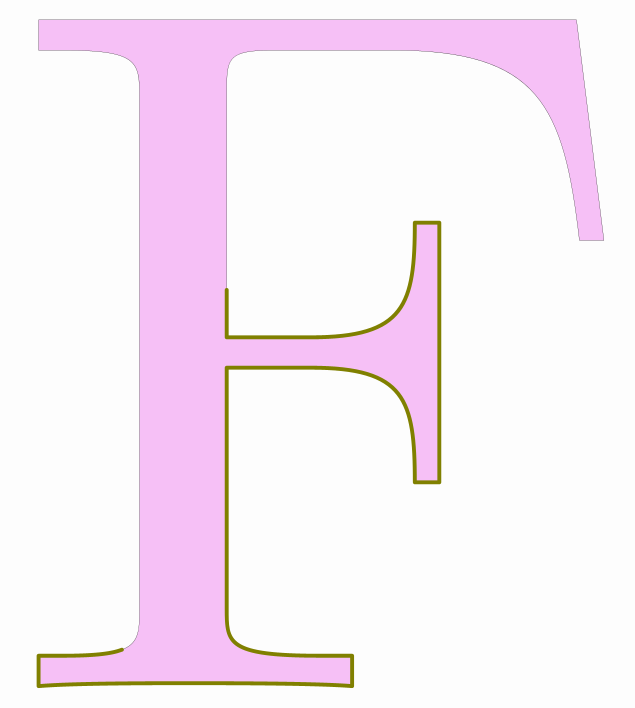
You can directly extract the subshape with the Shape method getSubShape(double a, double b) that works in a similar way. A new shape with the same styling parameters will be created. For example:
LatexShape F = LatexMathObject.make("F").get(0).center().setHeight(2);
Shape partialF=F.getSubShape(.2, .76);
F.fillColor("violet").fillAlpha(.5);
partialF.style("default").thickness(8).drawColor("olive");//Load default style to clear the style latexdefault
add(F,partialF);
waitSeconds(3);
gives the following image:
The ContourHighlight animation makes extensive use of the getSubShape method
Generating control points
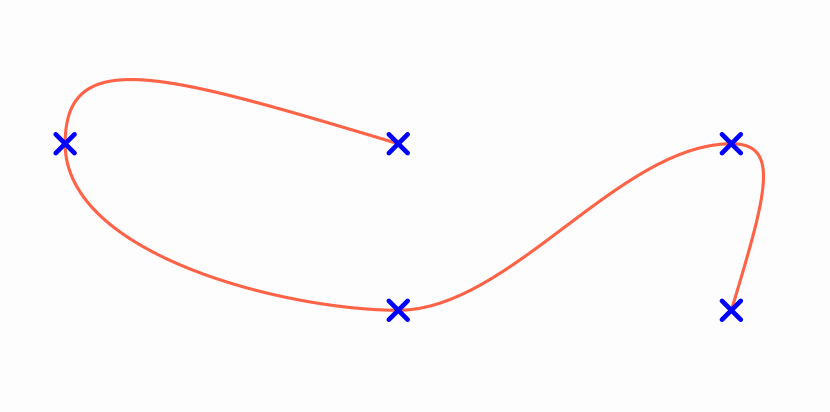
The class PathUtils has the static method generateControlPointsBySimpleSlopes that adjusts the control points of a Shape to give a spline-interpolated appearance. The following code creates a polyLine object and adjusts the control points to give a smooth appearance, using a tension factor from 0 to 1.
Point[] ps = new Point[5];
ps[0] = Point.at(0, .25);
ps[1] = Point.at(-1, .25);
ps[2] = Point.at(0, -.25);
ps[3] = Point.at(1, .25);
ps[4] = Point.at(1, -.25);
for (Point p : ps) {
    p.dotStyle(DotSyle.CROSS);
    p.drawColor("blue").thickness(60);//Points are blue crosses
}
Shape pol = Shape.polyLine(ps).thickness(10).drawColor("tomato");
add(pol);//Add polyline
add(ps);//Add all points

//Generate control points with a tension of 0.7
PathUtils.generateControlPointsBySimpleSlopes(pol.getPath(),.7);
waitSeconds(3);//3 seconds for a screenshot!
